スポンサーリンク
Overlay Weaverの動かし方をメモしておきます。諸事情により、英語併記。このエントリでは、主にPeer-to-Peer(構造化オーバレイ、DHT)アルゴリズムの実験・評価・検証を目的とします。実際に、構造化オーバレイアルゴリズムChordのネットワークをエミュレーションします。
I'll explain how to install and run Overlay Weaver, an overlay construction toolkit. This entry is for experiments and evaluations on Peer-to-Peer algorithms such as structured overlays and DHTs (Chord, Kademlia, Pastry...). In this entry, Overlay Weaver emulates Chord network (Chord is a typical algorithms of structured overlays).
目次
スポンサーリンク
目標/Goal
目標は、Eclipse上でOverlay Weaverのソースコードを表示したり、実際に動かしてみて、ノードの動作ログを取得することです。
The goal is to display souce code of Overlay Weaver and to get logs of node activities on overlay networks.
Eclipseのインストール/Install Eclipse
EclipseとJDKは、事前にインストールしておいてください。
Please install Eclipse and JDK individually in advance.
ソースコードを入手する/Get Source Code
ソースコードは、souceforge.netにあります。Eclipseの機能を使って、ソースコードを直接取り込みます。
The souce code is available at souceforge.net. I'll show you how to import it using eclipse.
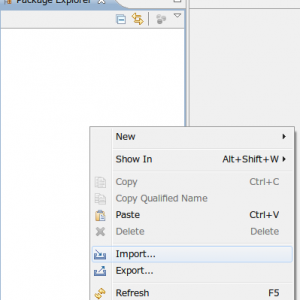
まず、Package Explorerの空白部分を右クリックして、Import...をクリックします。
First, right-click on space in "Package Explorer" and select "Import...".

次に、「CVS」、「Projects from CVS」、「Next>」の順にクリックします。
Next, click on "CVS">"Projects from CVS">"Next>".

続いて、「Enter Repository Location Information」に、次のように入力して、「Next>」をクリックします。
Enter repository location information as the following and click on "Next>".

Location
- Host: overlayweaver.cvs.sourceforge.net
- Repository path: /cvsroot/overlayweaver
Authentication
- User: anonymous
- Password:
Connection
- Connection type: pserver
- Use default port
次の画面で、「Use an existing module (this will allow you to browse the modules in the repository)」をクリックし、「overlayweaver」フォルダを選択して、「Finish」をクリックします。もしここで失敗した場合は、前の画面での入力内容を確認してください。
In next dialog, click on "Use an existing module (this will allow you to browse the modules in the repository)", select the folder "overlay weaver" and click on "Finish". If it fails, confirm your entry on the previous dialog.

ソースコードのダウンロードが終わるまで、しばらく待ちます。
Please wait for a little time until the eclipse finishs downloading the source code.

すると、Package Explorerに、overlayweaverフォルダが表示され、Overlay Weaverのソースコードを読めるようになります。
Then, the package explorer window display the folder "overlayweaver" and you can read the souce code of Overlay Weaver.

シナリオファイルを作成する/Create A Scenario File.
シナリオファイルとは、Overlay Weaverをオーバーレイシミュレータとして動かすときに必要な入力ファイルで、各ノードの動作スケジュールを記述したファイルです。
Scenario file is a file to run Overlay Weaver as an overlay network simulator and it is written about schedules of nodes in the network.
まず、シナリオを保存するフォルダを作成します。「Package Explorer」にある「overlayweaver」フォルダを右クリックして、「New>Folder」で、「Folder name」に「scenario」と入力して「Finish」を押します。
First, create a folder to store scenarios. Right click on the folder "overlayweaver" in the package explorer and click on New>Folder. Enter "scenario" into "Folder Name" and click on "Finish".

次に、「scenario」フォルダに、今回使うシナリオファイルを新規作成します。「scenario」フォルダを右クリックして、「New>File」で、「test-scenario」と入力して、「Finish」を押します。
Next, create a new scenario file in that folder "scenario". Right click on the scenario folder and click on New>File. Enter "test-scenario" and click on "Finish".

すると、test-scenarioの編集画面が表示されるので、そこに次に掲載するシナリオをコピーして、保存(Ctrl+S)してください。
Then, the editor for the file "test-scenario" is displayed in the eclipse. Copy and paste strings in the following file (open the following file, Ctrl+A and Ctrl+C) into the editor and save it (Ctrl+S).
すると、eclipseの表示は次のようになっているはずです。
Then, the editor should look like the following.

このシナリオファイルは、Overlay Weaver上で100ノードを起動して、全ノードがjoinした後、100回データをputして、そのデータを100回getする操作を表してします。今回は、私がすべてのシナリオファイルを書いてしまっていますが、join(invoke)・put・get・statusなどの、基本的なコマンドをすべて含んでいます。オリジナルのシナリオファイルを作成する際は、これを参考にしてみてください。
This scenario file means that a hundred nodes boot and join, nodes selected randomly perform put command and get command a hundred times respectively. I wrote the file in this time. But that file includes the basic commands: join(invoke), put, get and status. So, use it as a reference when you write your original scenario files.
ログ出力の設定をする/Configure Logging Settings
Overlay Weaverを実行すると、大量のログが出力されますが、必要のない情報(デバッグ用情報)も多数含まれるため、やや複雑です。そこで、必要最低限のログ出力になるように、設定を行います。
When you run Overlay Weaver, it outputs a huge amount of logs. The logs include a lot of unnecessary information (debug information), so it is a bit more complex. Therefore, configure logging settings for Overlay Weaver to output the minimum of the logs.
scenarioフォルダ(本当はscenarioフォルダである必要はないのですが)に、「log-off.properties」という名前のファイルを作り、中身に「.level=OFF」とだけ記述して保存してください。
Create the file named "log-off.properties" and write a line ".level=OFF" and save it.

実行用の設定を作成する
「Run>Debug Configurations...」をクリックして、Debug Configurationsを開きます。次に、左にある「Java Apploication」を選択して、左上にある「New」ボタンをクリックします。
To open "Debug Configurations", click "Run>Debug Configurations...". Next, select "Java Application in the left, click on the button "New" in the upper left.

Enter "Name", "Project" and "Main class" in the first tab as the following.

- Name: overlayweaver
- Project: overlayweaver
- Main class: ow.tool.emulator.Main
続いて、「Arguments」タブを開いて、「Program arguments」と「VM arguments」に次のように入力します。
Next, open the tab "Arguments", enter "Program arguments" and "VM arguments" as the following.

- Program arguments: "${project_loc:overlayweaver}\scenario\test-scenario"
- VM arguments: -Djava.util.logging.config.file="${project_loc:overlayweaver}\scenario\log-off.properties"
ここではファイルの区切り文字としてWindowsの「\」を使用していますが、他のOSでは、適宜書き換えてください。
In this example, I use "\" as a directory separator for Windows OS. If you use other OS, you do not forget to change the separator.
最後に、「Common」タブを開いて、「Standard Input and Output」の中にある「File」チェックボックスをONにして、右の入力欄に「${project_loc:overlayweaver}\scenario\test-scenario-out」と入力して、「Apply」ボタンを押します。
Finally, open the tab "Common", check the checkbox "File" in "Standard Input and Output", enter "${project_loc:overlayweaver}\scenario\test-scenario-out" into the right inputbox of the checkbox. Click "Apply".

実行/Run
「Debug」ボタンをクリックすると、Overlay Weaverがシナリオに従って実行されます。シナリオの内容は一気に実行され、その結果がコンソールに出力されます。出力全体は、scenarioフォルダのtest-scenario-outに保存されます。
Click the button "Debug". Then Overlay Weaver is executed based on the scenario file. It process the scenario right away and outputs the result into console. The whole of the output is saved the file "test-scenario-out" in the scenario folder.
まとめ/Conclusion
以上で、Overlay Weaverをeclipse上で動かすことができるようになりました。実は、先ほどの出力ファイルには、putやgetに要した転送回数(length)や、どのノードを経由したか、どんな経路表を保持していたかといった情報が含まれていて、これを分析することで、アルゴリズムの評価を行うことなどが可能です。
In this way, you can run Overlay Weaver using eclipse IDE. That output file includes various information about overlay network emulation(e.g. routing length, forwarding nodes, routing tables). So, you can evaluate algorithms by analyzing the output files.
今回は基本的な設定を紹介しましたが、いろいろ変更することで、いろいろな実験ができるはずです。ぜひ試してみてください。
In this entry, I showed the basic settings about Overlay Weaver. But you can experiment vearious situation. Please try it for yourself!
感想
英語と互い違いに書く関係でちょっと工夫が必要でした。英語を書くのにチラ見したサイト:「Eclipse IDE Tutorial」
スポンサーリンク
スポンサーリンク